Gestionarea modulelor cookie care sunt utilizate pentru publicitate, cum ar fi personalizarea anunțurilor, remarketing și analiza performanței anunțurilor.
2.7.4. Proxying traffic to web apps
For business hosting only
The ability to run web apps is only available on business hosting and is included in the plan price. If switch to shared hosting, web apps will no longer work.On the hosting is available the ability to proxying HTTP traffic to the local IP address, so you can run apps in PHP, Python and Go.
Scheme of work
We give you a unique local IP address of the form 127.*.*.*.*, where * is any number between 0 and 255, and the default port is 3000. You use these values in your app — you specify them in the run command or directly in the code.
flowchart LR
C([Client])
H1[sub.example.com:80]
H2[sub.example.com:443]
L[127.*.*.*:3000]
A([App])
C-->H1
C-->H2
H1-->L
H2-->L
L-->A
The order in which the request is processed:
- Request comes to the shared server on port
80or443. - Based on the hostname, forwards to the app to the local IP address.
- App receives the data, processes it, and returns a response.
The real IP address of the visitor is passed in the X-REAL-IP header.
Additional ports on dedicated IP
If you have a dedicated IP, it can additionally accept requests on any port in the range of3000-3100. This allows one app to accept traffic to the site while accepting another type of traffic on the dedicated IP port. It is also possible to run an app without proxying requests to the site — use a port on the dedicated IP and process different connections only on it.
Launch app
- Open the "Site settings" section.
- Switch "Web server" to "Traffic proxying" and save the changes:

- Locate your app files on the hosting in the desired directory.
- Open the "Web application settings" section.
- Specify the directory and command to launch your application:
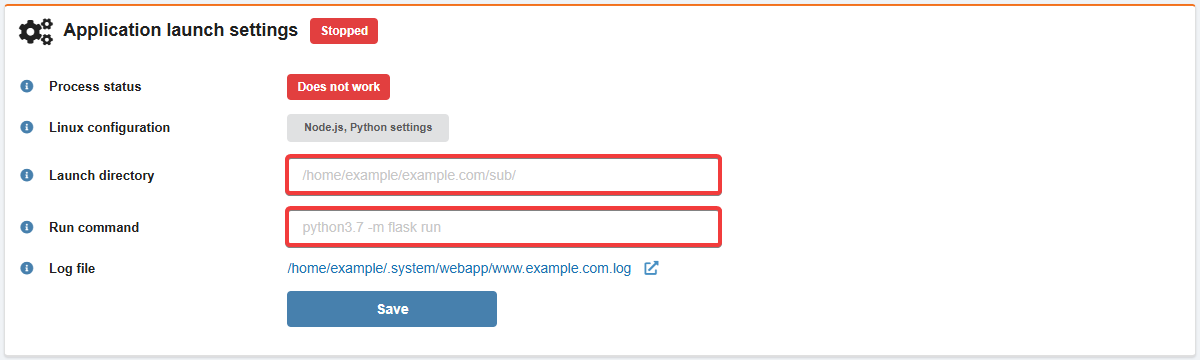
- Launch directory — path to the directory from which your app should launch. If left blank, the site root directory will be used.
- Run command — command to run your app. You can use the standard Bash control operators (
&&,;,||) to combine multiple sequential commands. In the run command or in the code of the app itself, use the local IP address and port from the "Proxying HTTP traffic to the application" block: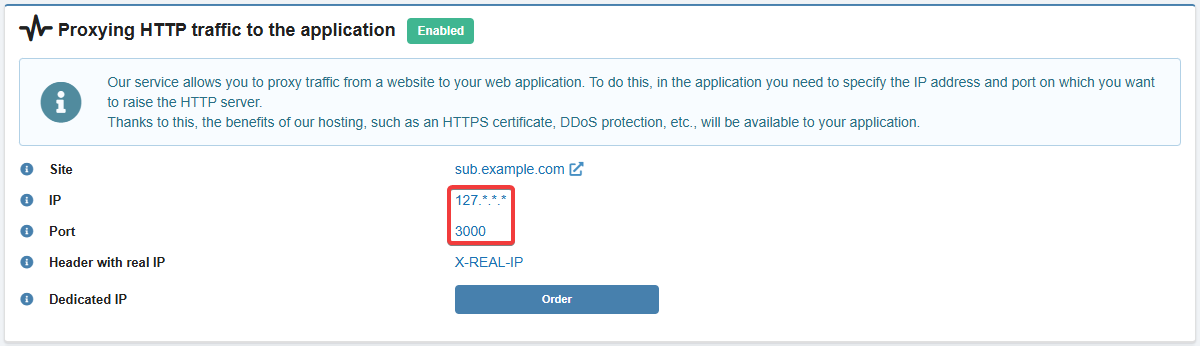
- Save the changes and test the app's operation:

In the "Application logs" block, you can monitor real-time logs as the app launches and runs.
Examples of launching apps
Attention!
In all commands, use your domain address instead ofexample.com, and use the name of your subdomain instead of sub.
PHP
Launching a simple HTTP server on PHP:
- In the "Hosting account settings" section (or "Hosting → Hosting account settings" section), set the PHP version to 8.0 or higher and save the changes.
- Connect to the hosting via SSH.
- Navigate to the subdomain directory where your project files will be located:
cd example.com/sub - Install Workerman:
composer require workerman/workerman - Create an
index.phpfile with this content (example "An http server" from the Workerman repository):<?php use Workerman\Worker; require_once __DIR__ . '/vendor/autoload.php'; // #### http worker #### $http_worker = new Worker('http://0.0.0.0:2345'); // 4 processes $http_worker->count = 4; // Emitted when data received $http_worker->onMessage = function ($connection, $request) { //$request->get(); //$request->post(); //$request->header(); //$request->cookie(); //$request->session(); //$request->uri(); //$request->path(); //$request->method(); // Send data to client $connection->send("Hello World"); }; // Run all workers Worker::runAll();In the line
$http_worker = new Worker('http://0.0.0.0:2345');, instead of0.0.0.0.0and2345, use the IP address and port from the web app settings page. - On the web app settings page, specify the run command (use your own data in the command):
/usr/local/php84/bin/php -c /home/example/.system/php/sub.example.com.ini /home/example/example.com/sub/index.php start - Save the changes, launch the app and test the site's operation.
If successful, the site should display the text "Hello World".
Launching a simple WebSocket server on PHP:
- In the "Hosting account settings" section (or "Hosting → Hosting account settings" section), set the PHP version to 8.0 or higher and save the changes.
- Connect to the hosting via SSH.
- Navigate to the subdomain directory where your project files will be located:
cd example.com/sub - Install Workerman:
composer require workerman/workerman - Create an
index.phpfile with this content (example "A websocket server" from the Workerman repository):<?php use Workerman\Worker; require_once __DIR__ . '/vendor/autoload.php'; // Create a Websocket server $ws_worker = new Worker('websocket://0.0.0.0:2346'); // Emitted when new connection come $ws_worker->onConnect = function ($connection) { echo "New connection\n"; }; // Emitted when data received $ws_worker->onMessage = function ($connection, $data) { // Send hello $data $connection->send('Hello ' . $data); }; // Emitted when connection closed $ws_worker->onClose = function ($connection) { echo "Connection closed\n"; }; // Run worker Worker::runAll();In the line
$ws_worker = new Worker('websocket://0.0.0.0:2346');, instead of0.0.0.0.0and2345, use the IP address and port from the web app settings page. - On the web app settings page, specify the run command (use your own data in the command):
/usr/local/php84/bin/php -c /home/example/.system/php/sub.example.com.ini /home/example/example.com/sub/index.php start - Save the changes and launch the app.
- Check the WebSocket operation:
- Open the developer console in your browser.
- One by one, execute the commands (use your site address in the first command):
const ws = new WebSocket('wss://example.com') ws.onmessage = m => console.log(m.data) ws.send('lorem ipsum') - If successful, the console should display the text "Hello lorem ipsum".
Django
Detailed information on working with Django is available in the official documentation.
Launching Django 4.2 on Python 3.10:
- In the "Hosting account settings" section (or "Hosting → Hosting account settings" section), set the Python version to 3.10 or higher and save your changes.
- Connect to the hosting via SSH.
- Install Django:
pip install --user Django - Navigate to the subdomain directory where your project files will be located:
cd example.com/sub - Create the new project named
project:django-admin startproject project . - Apply migrations:
python manage.py migrate - Edit your project's settings file
project/settings.pyand in the lineALLOWED_HOSTS = []specify in square brackets in single quotes the address of your site'sub.example.com'. - On the web app settings page, specify the run command:
python3.10 manage.py runserver 127.*.*.*:3000In the command, instead of
127.*.*.*.*and3000, use the IP address and port from the web app settings page. - Save the changes, launch the app and test the site's operation.
If successful, the site should display a page with the text "The install worked successfully! Congratulations!".
Solving a problem with styles in the Django admin panel:
- Edit your project's settings file
project/settings.pyand after the lineSTATIC_URL = 'static/' add these:import os STATIC_ROOT = os.path.join(BASE_DIR, 'static') - In the project directory, execute the command:
python manage.py collectstatic
Flask
Detailed information on working with Flask is available in the official documentation.
Launching Flask 2.3 on Python 3.10:
- In the "Hosting account settings" section (or "Hosting → Hosting account settings" section), set the Python version to 3.10 or higher and save your changes.
- Connect to the hosting via SSH.
- Navigate to the subdomain directory where your project files will be located:
cd example.com/sub - Create a Python virtual environment:
python -m venv .venv - Activate the created virtual environment:
source .venv/bin/activate - Install Flask:
pip install --user Flask - Deactivate the virtual environment:
deactivate - Create the
hello.pyfile with these contents (example "A Minimal Application" from official documentation):from flask import Flask app = Flask(__name__) @app.route("/") def hello_world(): return "<p>Hello, World!</p>" - On the web app settings page, specify the run command:
source .venv/bin/activate && python3.10 -m flask --app hello.py run --host 127.*.*.* --port 3000In the command, instead of
127.*.*.*.*and3000, use the IP address and port from the web app settings page. - Save the changes, launch the app and test the site's operation.
If successful, the site will display the text "Hello, World!".
Go
Detailed information on working with Go is available in the official documentation.
Launching a simple application on Go 1.20:
- In the "Hosting account settings" section (or "Hosting → Hosting account settings" section), set the Go version to 1.20 or higher and save your changes.
- Connect to the hosting via SSH.
- Navigate to the subdomain directory where your project files will be located:
cd example.com/sub - Create the
simple.gofile with this content (example "Introducing the net/http package (an interlude)" from official documentation):package main import ( "fmt" "log" "net/http" ) func handler(w http.ResponseWriter, r *http.Request) { fmt.Fprintf(w, "Hi there, I love %s!", r.URL.Path[1:]) } func main() { http.HandleFunc("/", handler) log.Fatal(http.ListenAndServe("127.*.*.*:3000", nil)) }In the line
log.Fatal(http.ListenAndServe("127.*.*.*:3000", nil)), instead of127.*.*.*.*and3000, use the IP address and port from the web app settings page. - Compile the created file:
go build simple.go - Set permissions to
750for the compiled file:chmod 750 simple - On the web app settings page, specify the run command:
./simple - Save the changes, launch the app and test the site's operation.
If successful, the site should display the text "Hi there, I love!" with the name of the page you accessed.
(2)
Comentarii
1. треба створити базу даних на в розділі "Бази даних"
2. і просто вписати її в settings.py
DATABASES = {
'default': {
'ENGINE': 'mysql.connector.django',
'NAME': 'назва бази даних - вказана в панелі керування базами даними',
'HOST': 'localhost',
'USER': 'юзернейм - вказаний в панелі керування базами даними',
'PASSWORD': 'пароль - вказаний в панелі керування базами даними',
'PORT': '3306'
}
}
Чи є якісь заготовлені команди в linux щоб зробити рестарт додатку через SSH? Чи прийдеться все таки через HTTP запит на API хостингу робити перезапуск додатку?